The first few times that you practice driving are likely to seem uncomfortable and confusing. The driver’s education car won’t be familiar to you, you aren’t familiar with centering the car on your lane and you may have never experienced the view from behind the wheel before. There are many new things happening all at once. Even if you followed my advice and practiced in a parking lot, once you get out onto the road, things change drastically. Not only do you need to be able to control the vehicle like you did in the parking lot, but now you also need to worry about lanes, speed limits, traffic, pedestrians and so much more. Everything seems to be happening faster than you can take it all in and process it. You will try to keep your lane, try to keep your speed, and try to remember to check your mirrors and blind spots, but it will feel like none of it is going quite right. This is not something to worry about, once you get started, you will be surprised how quickly things improve.
First Behind the Wheel Lesson
Your first behind the wheel lesson will include some time for learning what and where the controls are inside of the car. Just like in the parking lot you will need to familiarize yourself with the car and adjust everything so that it is just right for you. When you do get out on the street for your first lesson you will be driving in a driver’s education car. The driver’s ed car will have a brake on the passenger side so that in an emergency the car could be stopped from the instructor’s seat. We don’t like to use that brake, we want you to be in control of the vehicle, but it is there just in case. You will head out on the road and begin. At first, you will try to stay in your lane. As your speed increases you may notice yourself swerving from side to side a bit. If this is happening you should look a bit further down the road, usually this will help to smooth that out a bit. As you try to keep your lane, you will also need to glance down at the speedometer to see how fast you are moving. As you are looking at the speedometer, you are likely to lose your lane a bit. After a few miles, this will begin to get easier. Once you are able to keep your lane and maintain speed, you will need to think about scanning the road ahead properly and checking your mirrors every 6-8 seconds so that you know what is going on around you. When your instructor feels that you are catching on, they will have you turning through some intersections, changing lanes and practicing all sorts of new tasks that you may have never experienced before. You may have been watching your parents drive for years, but it is a whole new game when you get behind the wheel.
Reminders
Your instructor will continue to remind you of things such as checking blind spots, using turn signals, scanning down crossroads, etc. as you drive. The roads that you will travel will be fairly easy for this first lesson. While the roads may not seem or feel very easy to you, your instructor has taught many people to drive and has been getting a feel for your competence since you first got into the car. They will instruct you to drive roads that they feel are well suited to your skills. Be aware that while everything seems to be happening very fast for you, the instructor has done this many times and is scanning the roadway and reading your driving style and is typically able to see problems coming far in advance. It is very rare that we need to use the extra brake, usually we can just instruct you to brake if need be. You will likely be driving through some fairly easy residential streets and maybe some rural roads on your first lesson.
Some Beginning Tasks
The first lesson is also used to introduce you to some of the more simple procedures that you will need to know. Lane changes, turns, pulling to the curb, backing and possibly Y-turns. It works best to practice a bit of many different things rather than just continually practicing one or two things. For whatever reason, our bodies and minds seem to catch on to all of these multi-layer tasks better over time than all right away, and we also tend to learn better if we try things a few times and then go and do something else. To keep trying something over and over again without a break just doesn’t work. Our body and mind seem to need time to re-group and figure things out. So, we have you do all sorts of these easier tasks in that first lesson , but not too much of any one activity. This gives you a chance to get a feel for many of the core skills that you will need to be a good driver in the future. Even if you feel like you are messing it all up on that first lesson, believe me when I tell you that the next time you get behind the wheel with your parents a day of two later, many of the things that you struggled with on your first lesson will already seem easier. I don’t know if you have ever practiced playing a musical instrument, but if so, this phenomenon is very similar. Sometimes you will practice and practice playing a song and never get it right. Then, you go to bed and try it again the next day and you get it right on the first try. I can’t explain how this works, but it is very similar with learning to drive. The progress that you make while you sleep will surprise you, especially over the first few weeks of driving.
Lane Changes
As you are driving down the road, you decide you need to change lanes. First of all, you need to be aware enough of your surroundings to know if this is even possible at this time. There is no sense in going through the rest of the motions until you have a pretty good idea that it is possible. If you have been checking your mirrors every six to eight seconds as you should be, you will have a pretty good idea of whether or not there is space to change lanes. If you think it is possible, you need to check your mirrors, apply your turn signal, check your blind spot and move over. The order in which you do these things is of vital importance. I see too many people doing them out of order and making dangerous lane changes. You need to make the move the second after you check your blind spot. If you wait a few seconds and then apply your turn signal, you will need to check your blind spot again. The blind spot check is always the last thing you do, directly before the move. Applying the turn signal is not just another necessary action, it is letting other drivers know that you plan to change lanes. Once they know that, you just need to check and go. This lane change procedure applies to any lane change. Use this procedure when you are pulling to the curb to park, when you are changing lanes right or left, when you are merging into traffic and when you turn right or left.
Turning
Any time that you need to make a turn, you need to first check your mirrors, then apply your turn signal, then move to the lane nearest the turn. When turning right, this often means that you need to move into the parking lane or bike lane. This may feel counter-intuitive, but consider it logically. If you are as far right as possible, then no one else will drive into that space to cause an accident when you turn. Also, whether turning right or left, you take one more glance at your blind spot, right before the turn, just in case someone has moved into the space or someone is coming off the curb or into the crosswalk.If you are turning left, there may be a left turn lane, otherwise just get close to the center line. You must always yield to oncoming traffic when turning left. One of the most dangerous maneuvers in driving is the left turn across traffic. Often times, in multi-lane intersections, there are cars waiting to turn left in front of you and other cars going straight through the intersection. Keep your wheels straight until you actually start your turn, and wait until you are sure that there is no one coming. Also, at lighted intersections, you may find yourself in the middle of the intersection waiting to turn left, when the light turns yellow or even red. That’s fine, don’t panic, you just complete your turn as soon as you can. This is how the intersection should work, so that even in really heavy traffic at least one car will get to turn left in each light sequence.
Pull to the Curb and Park
This is one of those simple little maneuvers that you will use often and that you will be required to do on your road test. This is basically the same as a lane change followed by a stop and park. You check your mirrors, apply your turn signal, check your blind spot and then pull over to within one foot of the curb and stop. Typically, there is a curb apron, which is the concrete t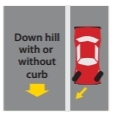 hat is attache
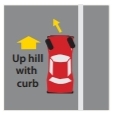
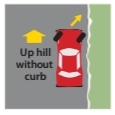 d to the curb and is about one foot wide, so make sure that your tire is on that apron. Once you have stopped, put the vehicle in park or leave it in low gear if it has a manual transmission and then apply the parking brake. If the road that you are on is flat, then you are finished. If you are on a hill, you need to follow some special rules. We always use the phrase “up, up and away” just like Superman used. When it comes to parking it refers to the direction that you must turn your wheels when parking on a hill. If your car is facing up and the curb is sticking up, then you turn your wheels away. In all other situations you turn your wheels toward the edge of the road. (photos courtesy of WI DOT)
Backing up in a Straight Line
Backing in a straight line is a fairly simple task and it is one that will likely be included on your road test. To start, you need to pull to the side of the road using the same steps as listed above. Mirrors, turn signal, blind spot, move over. Once you are stopped within one foot of the curb, you will need to put the car in reverse, look out the back window, and back up in a straight line for about 50′, keeping your car equidistant from the curb and backing up at a speed no faster than a slow walk. Once you can do this without straying from the curb or running into the curb, you are in good shape. Remember to always look out the back window while the car is moving backwards. Never look forward again until the car has stopped moving backwards. When looking out the back window, you are allowed to have only one hand on the steering wheel and one hand on the back of the seat if it helps you to look behind you. Remember when you are driving in reverse, go at the speed of a slow walk.
Practice
These are all good procedures to practice with your parents. Remember, you must get out there and drive with your parents as much as possible. Driving to and from school each day is great for a few days, but after that you really aren’t learning a lot, because it is always the same roads and same intersections. Try mixing it up a bit, maybe you can take a different route home? maybe you can practice a few maneuvers on the way home? Don’t get me wrong, whenever you are driving,it is better than not driving. For now, don’t get too technical. Stick to some of these basic maneuvers and keep reminding yourself about scanning, mirrors, turn signals and blind spots.