 The Y-turn is great on city streets and rural roads when the need arises to turn around. If done properly, it can be quick and safe. This is a great maneuver to practice as it can be done almost anywhere and it involves a lot of looking around, checking mirrors and blind spots, rapidly spinning the steering wheel, shifting the transmission and using turn signals The goal is to get the turn done safely and without interfering with any other drivers. This maneuver is likely to be on your road test, so you need to be good at it. A Y-turn can be performed mid block where a U-turn would not be allowed.
How to make a Y-turn
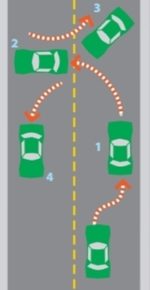
Step 1: Pull to the curb using the standard procedure for this. Mirror, signal, blind spot, pull to within one foot of the curb
- When you are pulled to the curb like this, it is important to realize that you are now in a parked position and in no hurry to get the turn started. You can wait here indefinitely, so there is no sense in pulling out into traffic and slowing everyone down, just wait for a nice clear section and then proceed to step 2.
Step 2: Turn your steering wheel all the way to the left, apply your left turn signal, scan down the road in front of you to make sure it is clear, check your left rear view mirror, check your left blind spot and pull across the roadway when it is safe to do so.
- You will want to keep the wheel turned as tightly as possible and you want to pull forward as far as possible without going off of the road or hitting the curb or someone’s mailbox. I have seen people go into the ditch on slippery rural roads, so be careful not to go to far or too fast.
Step 3: Put the car in reverse and spin the steering wheel back to the right as far as it will go. While you are spinning the wheel, you should be looking left and right to keep an eye on the roadway and check traffic from both directions. This needs to be done quickly, because now you are blocking traffic. You should be turning the steering wheel as fast as possible, don’t worry you wont break it. Once the wheel is all the way right, look out the back window and proceed to back up when it is safe to do so. Back up only far enough so that you can proceed forward.
- You can see in the picture above that step 3 has the car all the way across the road. This is typically way too far back unless you are on a very narrow road. This is the part that new drivers often mess up. They usually back up all the way across the road to the other side. This is a problem, because if they do that, cars could now sneak past in front of them stopping the maneuver and now they are blocking the lane behind them. If done properly and you back up only far enough to clear the curb, you can usually complete this maneuver without going back into the lane from where you began.
Step 4: Put the car into drive, spin the steering wheel back to the left looking both directions as you spin the wheel to check traffic, then pull forward and proceed when it is safe to do so.
Wrapping it Up
The first time that you do this maneuver it is likely to be choppy and slow, but with practice and time, it will become smooth and quick. Your driving tester will want to see you do this without hesitation and thinking about each procedure. You need to have it all figured out. No fumbling for the controls and forgetting to look around. I see many students who just look forward or down while turning the steering wheel. You have nothing else to do while turning the wheel, you don’t need to watch the steering wheel spin, you need to be looking for traffic, letting that tester know that you are alert and aware of your surroundings.
Remember, not only is the tester checking to make sure that you know the rules and can operate a motor vehicle, they want to know if you are a good driver. Your job is to make them feel confident and secure in your abilities.
The picture above comes straight from the Wisconsin Motorists Handbook.